Progress pictures are one of the most important pieces of evidence you can use to demonstrate all your hard work. Check out these key tips to make sure you are photo-ready every time.
Key takeaways
- Invest in high-quality equipment and set-up to ensure that your pictures are consistent and effective for measuring progress.
- For best results, ask a friend or invest in a tripod.
- Keep all the conditions the same every time.
- Take pictures at least every two weeks but remember that it may take several weeks for a visual change to become apparent.
What you need
- A smartphone or camera.
- A smartphone or camera tripod to ensure consistent height and angles. This is optional but it is relatively inexpensive and greatly improves the quality of pictures.
- A friend or family member to take the pictures. Alternatively, you can use the self-timer function on your camera (selfies taken in the mirror holding a camera will not do!).
- Use the same location. Ideally, a clear, white or dark background that is free from any distractions and clutter.
- Use the same lighting every time. Too bright and it washes all the detail out. Too dark and you will cast shadows that can mask progress.
- Floor markings (optional).
- Wear the same clothing every time. We recommend that men wear shorts and no top, and women wear shorts and a sports bra.
Trainer Tip
Adjust your shorts to around waist height or just below, so that they do not conceal body fat. Remember that the pictures are for you to document your progress, not to share with the world!
If you do not have an appropriate space to take your pictures at home, most commercial gyms have studios with blank walls that you can use.
Frequency and timing
Take your first set of pictures when you first get started with the U.P. app. After this, retake them every two to four weeks.
Take pictures first thing in the morning, after using the bathroom and before eating or drinking anything (where possible).
If you take pictures later in the day, make a note of the time and the number of meals you have eaten. Aim for a consistent time and always take them before training.
Trainer Tip
Taking pictures after a workout can be incredibly motivating, especially towards the end of your transformation. However, we advise always taking your progress assessment pictures before your workout.
From experience, four weeks is the average amount of time you need to wait to see significant changes in progress pictures. Taking pictures every two weeks gives you an opportunity to practice and an extra source of accountability. However, do not be too disheartened if you cannot see transformational changes each time.
How to measure
The following instructions are for you to follow when you take your progress pictures:
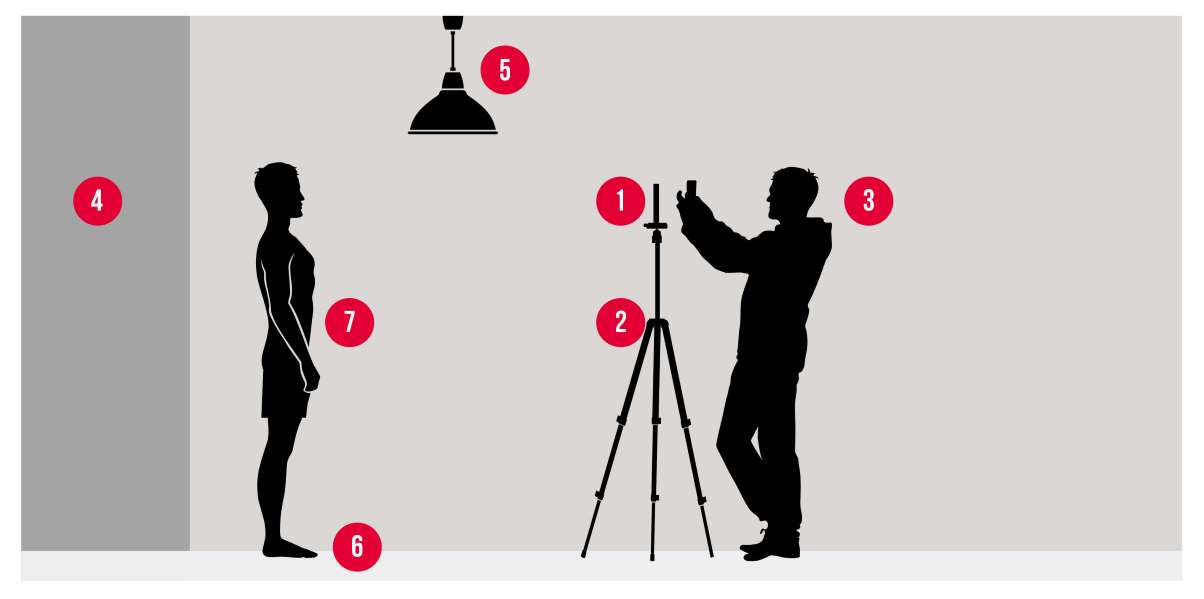
Stand roughly one foot in front of the wall.
Stand upright with your feet shoulder-width apart and arms hanging by your side. Look straight ahead and do not forget to smile!
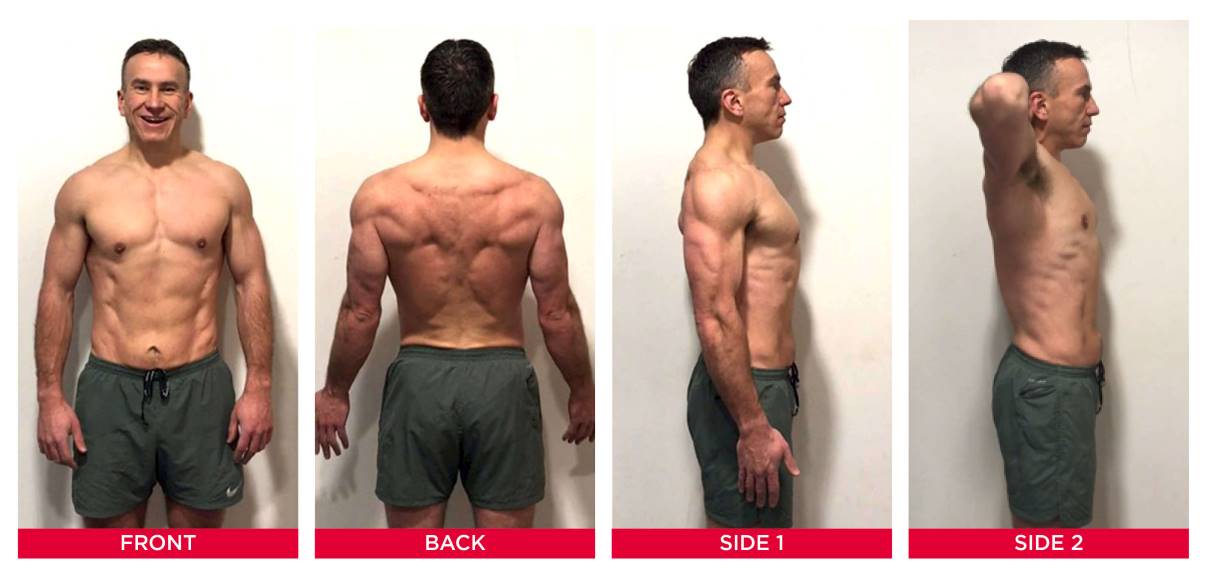
See the pictures below for examples of the four different poses.
If you have someone to help you, make sure they follow these steps when taking your progress photos:
- Set the camera height between chin and eye level.
- Position the camera far enough away to include your full body in the picture. You can always zoom in later, but you cannot zoom out!
- Keep the phone vertical and not tilted up or down to avoid distorting the pictures.
- Take several pictures for each pose, review them to see if they are in focus and retake if needed.
Trainer Tip
Do not try to exaggerate your starting pictures by slouching or forcing your stomach out. A simple way to standardise your posture is to tense your abs every time.
Measure the distance between your position and the camera. Make a note of this and all other set-up details so that you can reproduce them each time.
How to compare your progress pictures
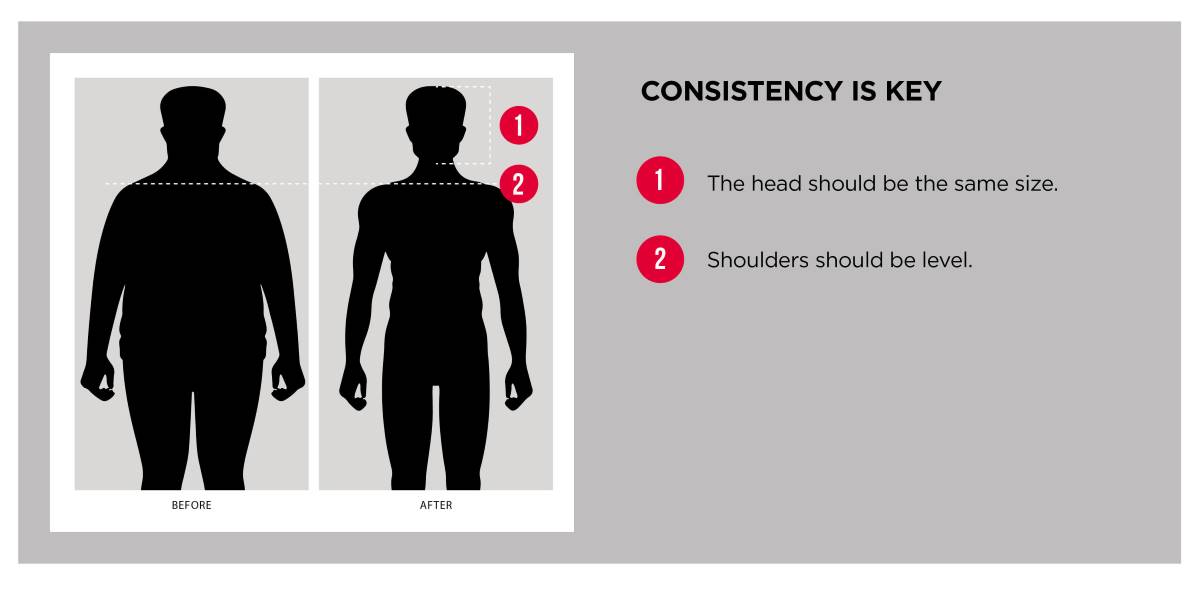
After each progress picture update, you need to compare the latest pictures to your previous set to assess your progress.
The good news is that the U.P. app takes all of the hard work out of the process!
If you keep the camera height and angle consistent each time, then the pictures should fit together without needing much adjustment.
Take your time to make sure the pictures are the same size and line up. Position the pictures so that your shoulders are level and zoom in and out until your head is the same size in each picture.